Showing posts with label Chassis. Show all posts

Friday, August 03, 2012

BMW /2: Replacing the shock eye bushings (silent blocks)

I suggest that you remove the shock bolts and inspect your bushings. BMW calls them silent blocks.  If they look like this, then you're probably not getting the best suspension performance and there is a risk you can damage your shock body.


Bench Mark Works has them in stock. They aren't expensive. You need six: four in front, two in rear. 


A 15 mm Craftsman socket works well as a drift to push out the old spacer in a press or vice. Not much force is needed. 
Here, I'm pressing in the new bushing.  On the other side, I use two aluminum blocks. You could also use a large socket if you have one. 
The rear shock lower bushings are replaced with the shocks bushings with the shocks on the bike. I used a long bolt, a few fender washers and some sockets to press out the old bushing and press in the new ones. 

Overall, this is an inexpensive and worthwhile job to perform on your /2.  

Tuesday, July 31, 2012

BMW Slash Two wheel bearing pop quiz - Let's play "what's wrong?"

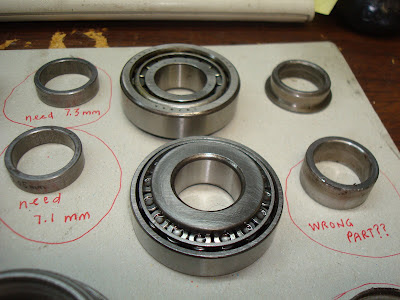
Yesterday, after disassembling the wheel bearing and seals from Randy's Slash 2, I noticed that the wheel bearings needed to be replaced. Today, I obtained four new bearings. New SNR 30204A.

After arranging the parts on my workbench, I began to get confused.

Some of the spacers appeared to be incorrect.

I labeled them with "Wrong part?" 


Three of the end caps that retain the felt washers were mangled and are on order now.


There was also a missing felt seal that is on order. The other felt seals are in good shape.


Two of the collars appeared to be incorrect parts. Here's one:


Maybe someone made this part to replace a missing or damaged part?  Even so, the new part is shaped incorrectly and it has a large gouge in it.


This felt seal arrangement is an early design that was later replaced with a rubber seal system. However to do that, you need to upgrade several other parts. Here's a diagram showing the new style seal:


New Style Seal


From Bench Mark Works site:

36 31 4 038 230--$9.95--seal hub plug late R50/2-R69S
36 31 4 038 243--$25.00--wheel thrust sleeve LHS for late hub plug R50/2-R69S use in 36 31 4 038 272
36 31 4 038 272--$69.00--hub plug late style  R50-R69S requires use of new type sleeve 36 31 4 038 243 and 36 31 4 038 230 seal 

On the brake drum side, You can also eliminate #4, 5 & 6 by using this:
36 31 4 038 259S--$10.00--seal substitute for the felt ring and cover inside wheel RHS R50-R69S

So we are looking at close to $200 to upgrade to the new style seals. I felt that the upgrade was too expensive for this build.


I will order new end caps and seals in the old style, and will instead try to source used parts to replace the parts marked "wrong part?" in my photos below.

36 31 4 038 259F--$2.00--felt ring RHS and inside old style hub plug R50-R69S 
36 31 4 038 255--$6.50--cap for felt ring early wheel hub plug and inner wheel RHS felt seal R50-R69S

Hmm.  What to do!?!

Posted by Picasa

Thursday, July 26, 2012

Servicing the Earles fork

Today, let's focus on servicing the Earles fork.

I always try to keep a new set of tapered bearing and sleeves on hand incase a customer bike comes in with worn old style ball bearings, or even worn tapered bearings.  It is too dangerous to ride with bad bearings and I will always recommend replacing them as soon as possible with new bearings.  Tapered bearings far outperform the original 23-ball-race factory bearings.

Tear down on this R60/2 showed me that the head bearings need to be replaced. They had a notch at the center position. You can check this when the front wheel is off the ground and the steering damper all the way loose.  Move the steering left and right through its travel and if you feel a "notch" or drag at the center position, the bearings are probably shot.  Later in this article, I will also tell you how to determine if your steering bearings are too tight or loose.

State of affairs.

Support the front of the bike on jackstands or blocks of wood.  I normally connect a safety strap to a ceiling joist when I am jacking a bike. Remove the front wheel, brake and set aside.

Remove the swing arm axle nut and unscrew the bolt.  The nut serves as a lock nut.  The bolt is threaded into the fork and tensions the bearing.

Earles Fork Spacers are bike-specific and side-specific.  Some don't use one spacer, or both are on one side. Note the position of the spacer washer(s), if any.


Earles swing arm pivot bearings. These are lubed and looking pretty decent.
Left side looking good too.

Clean bearing races of old grease. 
Outer races for Earles fork swing arm bearings are worn (showing bearing shadows) but not detented.
The other side looks ok too.

Apply new grease. (Wheel bearing grease.)
Fresh grease.
Seals look good.
Before repacking with grease, I did spin the bearings dry to get a feel if they were smooth.  They were.
State of affairs.  
Removing the Earles fork top plate.
Someone had arranged the harness through the fork square so I had to remove the wiring harness from the ignition board in order to remove the headlamp nacelle.  A bit of a delay, but it gave me time to clean and seat the bulbs in the green and red sockets.
Upper lower race. Rusted and detented.  There was only a little dried grease here.  These may have never been serviced in 50 years. 

Lower upper race looks like original factory grease. Race is dented.
Lower inner race.
Upper top race is detented and dry as a bone.  Pitted.
Posted by Picasa